


Welcome to my latest blog post, which is a crash course on NextJS and Fauna, in this blog post I am going to show you how to Create a Database, Read from that database and finally update the collection.
If you are looking for a video version you can find it here:

The Setup
To begin with lets create a database, and prepopulate it with test data. Firstly sign up or login to your fauna account and click Create new database and you should have a screen that looks like this:
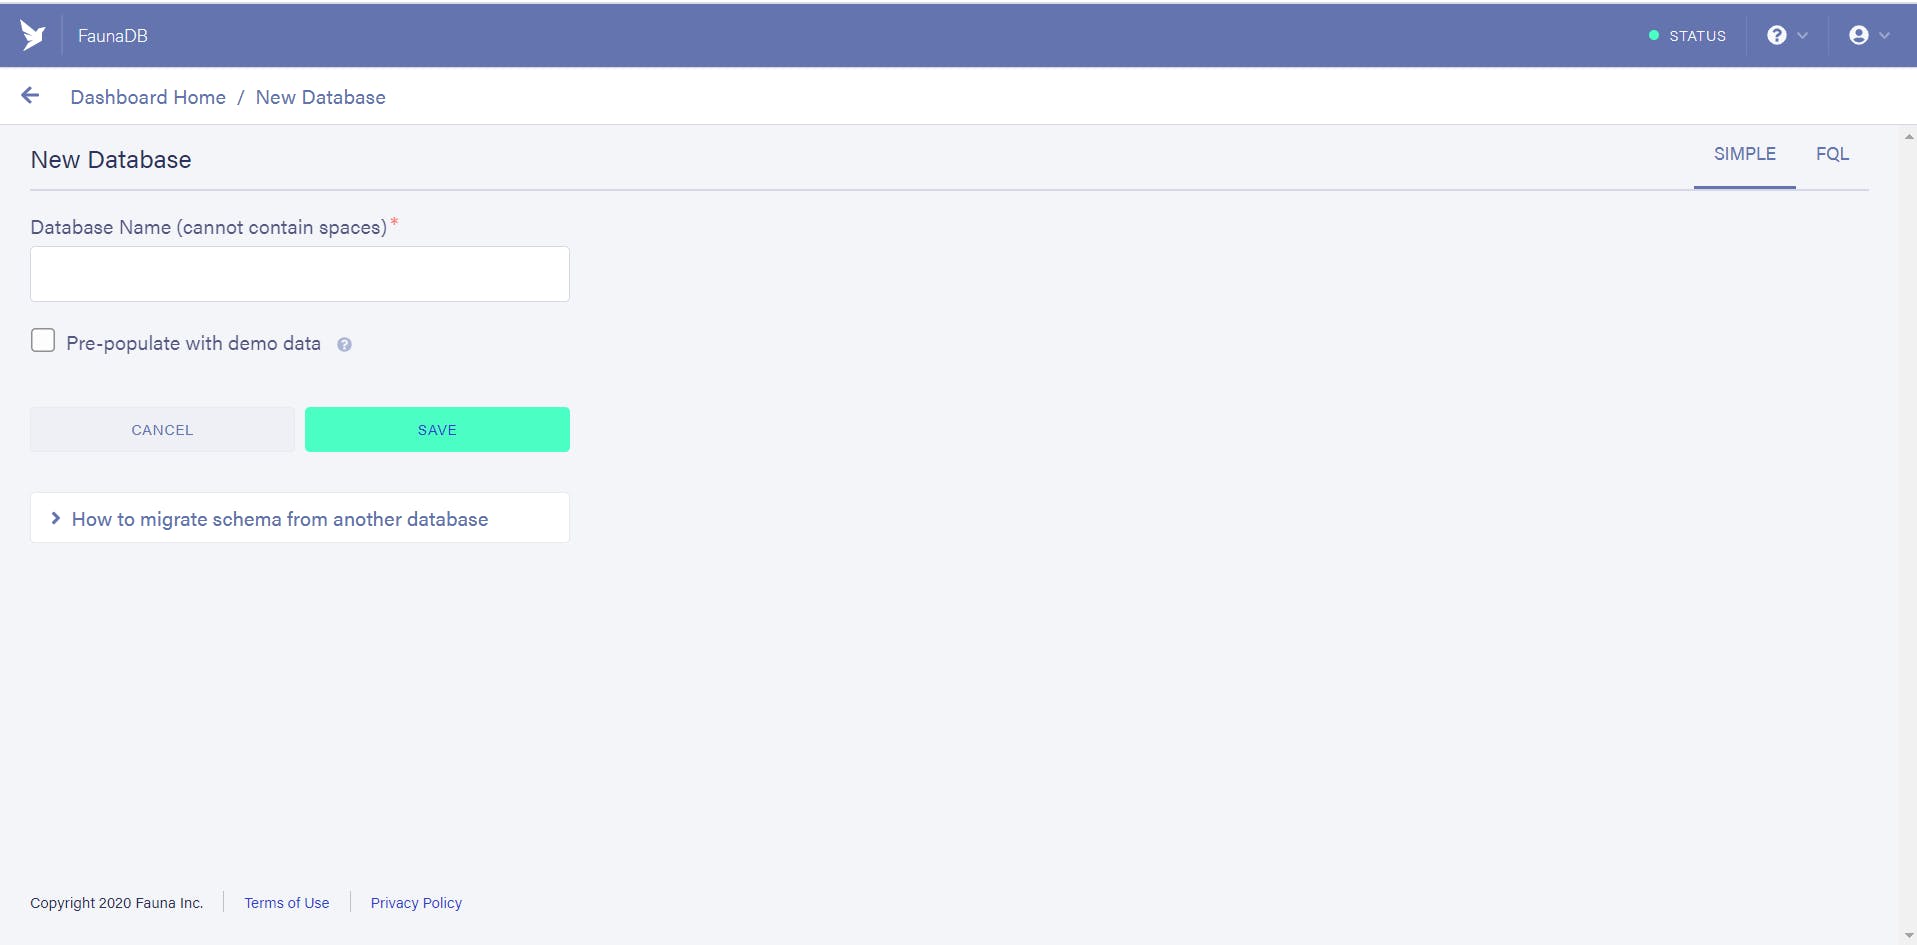
Give your database a name, for this I am going to name it next-with-fauna and click the Pre-populate with demo data, and press save. After a few seconds you should now be able to see a dashboard, with collections on one side and indexes on the other. You are now ready to start coding.
Create our next app
Open up your favorite editor and type in
npx create-next-app next-with-fauna
Once the pre-population has occurred remove everything inside your /pages/index.js, return function so only a single div remains, and go ahead and remove the hello.js from your /pages/api/ .
export default function Home() {
  return <div></div>;
}
Install faunadb
We also need to install fauna through NPM so we can use their great client.
npm install faunadb
Create a key for faunadb
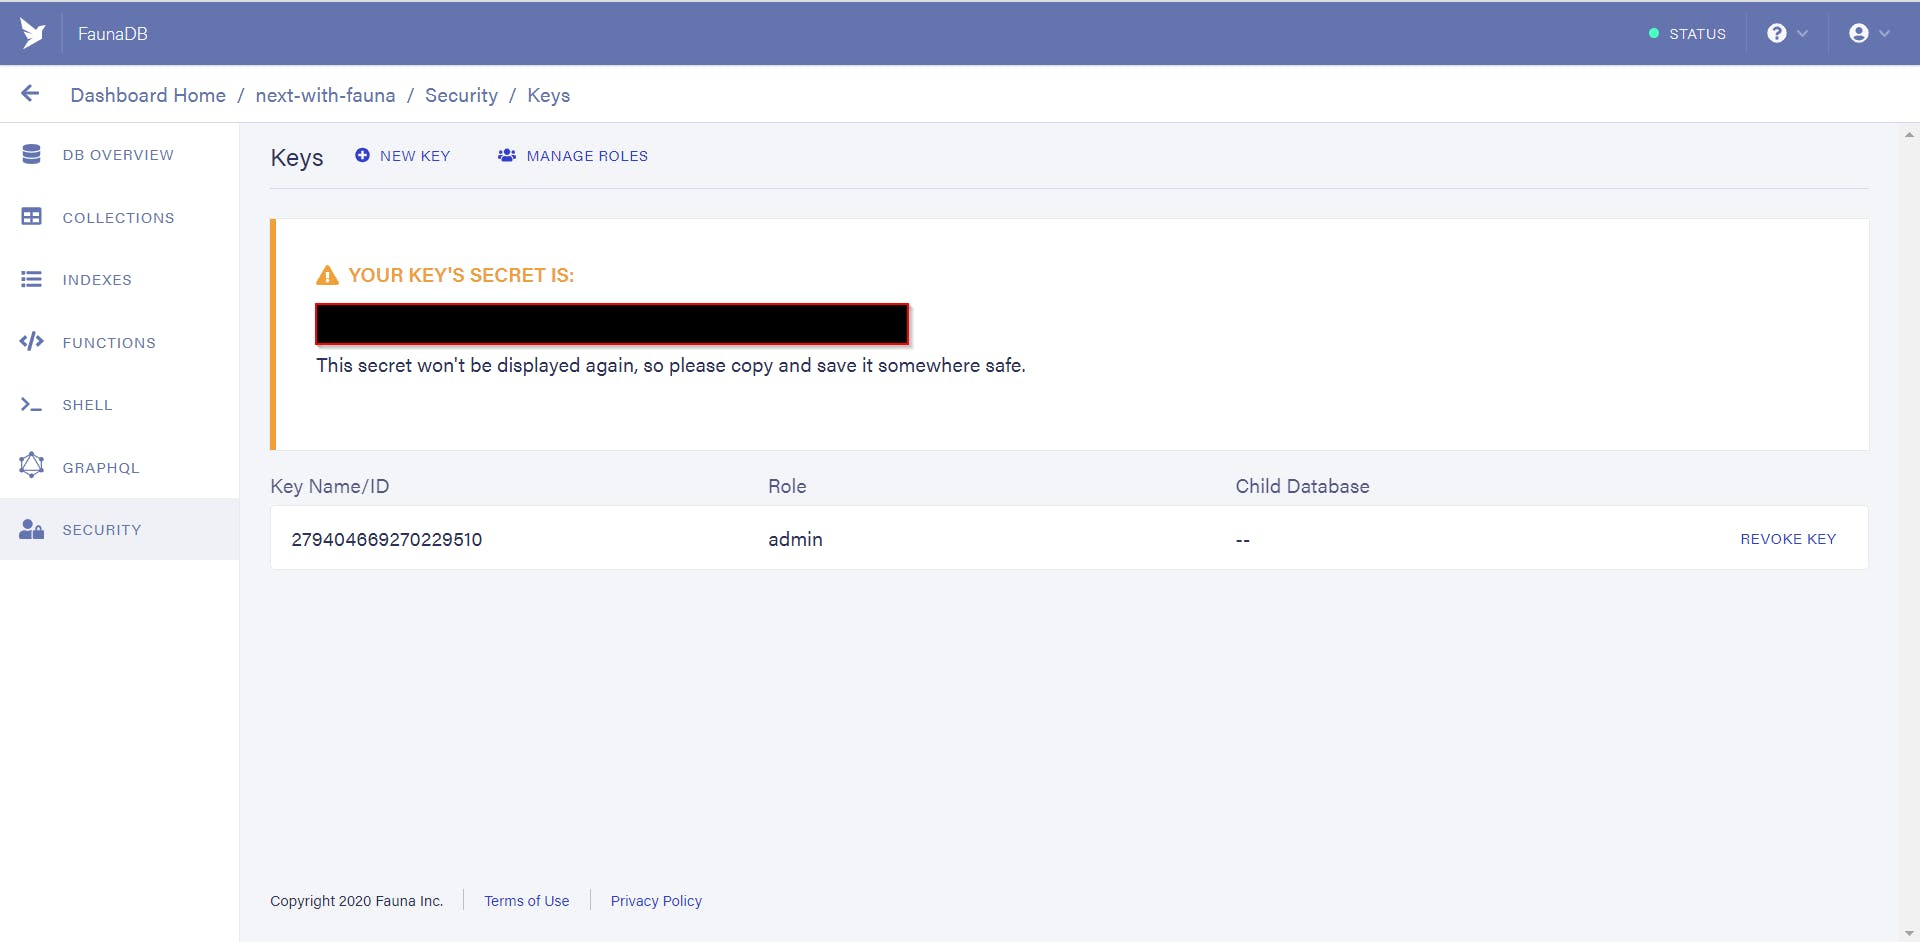
We also need a key to be able to tell fauna who we are when we are attempting to talk to our database. So go back to your dashboard, and select Security , click the big green New Key button, make sure the database is the one you are using and hit save. Below is what you we see, except the big black bar will be your key.
Add a .env file with the following name FAUNADB_SECRET_KEY=<YOUR_SECRET_KEY>
Vercel setup
Firstly we need to install vercel-cli to be able to use vercel dev(trust me its amazing).
npm i -g vercel
Then go ahead and login to your vercel account by typing
vercel
Once you have logged in, you can add the FAUNADB_SECRET_KEY so if you deploy it will automatically know to read this from your vercel account instead of .env
vercel add secrets FAUNADB_SECRET_KEY <YOUR_SECRET_KEY>
Now we are ready!
Creating our first serverless function.
To begin this coding journey, lets start with the serverless function that will get all our customers from our database, under your /api/ directory create a new folder called customerData and inside that folder create a index.js file.
First we will start by importing faunadb, our secret and the faunadb client which will set us up to start making request.
// import faunadb from node
const faunadb = require("faunadb");

// use our secret

const secret = process.env.FAUNADB_SECRET_KEY;

// use the faunadb query
const q = faunadb.query;

// create our client using our secret
const client = new faunadb.Client({ secret });
A serverless function starts the same way each time module.exports = async (req, res) => {} so we are going to add that to our file and start our requests.
// import faunadb from node
const faunadb = require("faunadb");

// use our secret

const secret = process.env.FAUNADB_SECRET_KEY;

// use the faunadb query
const q = faunadb.query;

// create our client using our secret
const client = new faunadb.Client({ secret });

// start of our requests
module.exports = async (req, res) => { }
Using fauna is probably different than other databases you have interacted with and that's because its built for the JAM. Lets create the request and then we can explain it step by step:
// import faunadb from node
const faunadb = require("faunadb");

// use our secret

const secret = process.env.FAUNADB_SECRET_KEY;

// use the faunadb query
const q = faunadb.query;

// create our client using our secret
const client = new faunadb.Client({ secret });

module.exports = async (req, res) => {
  try {
    const dbs = await client.query(
      q.Map(
        // iterate each item in result
        q.Paginate(
          // make paginatable
          q.Match(
            // query index
            q.Index("all_customers") // specify source
          )
        ),
        (ref) => q.Get(ref) // lookup each result by its reference
      )
    );
    // ok
    res.status(200).json(dbs.data);
  } catch (e) {
    // something went wrong
    res.status(500).json({ error: e.message });
  }
};
Inside the try we are creating a constant called dbs which makes a request using the fauna db client, we then create the actual query.
q.Map(
        // iterate each item in result
        q.Paginate(
          // make paginatable
          q.Match(
            // query index
            q.Index("all_customers") // specify source
          )
        ),
        (ref) => q.Get(ref) // lookup each result by its reference
      )
The Map returns a new array with the results of calling the lambda function on each item in array, or as I put it, iterates each item in the result. The Paginate function takes the Ref on the last line, and returns a page of results. The Match function finds the "search terms" provided to Match, which in our case is the index called ("all_customers").
Then the (ref) => q.Get(ref) looks up each result by the referenced above. Finally the dbs will be full of customers! If all goes well we will return res.status(200).json(dbs.data); which will be our array of customers.
Using our serverless function
Now we have a serverless function we should test it out before creating any UI code, inside your /pages/index.js we are going to add some state and use the useEffect. So at the top import in import { useEffect, useState } from "react"; and then we can start creating our request.
import { useEffect, useState } from "react";

export default function Home() {
const [data, setData] = useState([]);

useEffect(() => {

  }, []);

  return (<div></div>);
}
Now we have data which is a state that is an empty array, and useEffect ready to call our serverless function. Lets create a function called getCustomerData that requests our data and we can reuse this later once we add a new customer.
Calling the serverless function
NextJS is built for serverless functions, and we can create an async function to do this without any special code, all we need is a simple fetch request.
async function getCustomerData() {
      const res = await fetch("/api/customerData");
      const newData = await res.json();
      setData(newData);
    }
This async function makes a request to our api, then updates the state to contain the customer information. Now we are finally ready to make this request! Go ahead and add getCustomerData() to the useEffect and we can test, to make sure you are all in the same below here is our current code.
import { useEffect, useState } from "react";

export default function Home() {
const [data, setData] = useState([]);

async function getCustomerData() {
      const res = await fetch("/api/customerData");
      const newData = await res.json();
      setData(newData);
    }

useEffect(() => {
getCustomerData();
  }, []);

  return (<div></div>);
}
Launching our code using vercel dev.
Now we are ready to launch our code, go ahead and use vercel dev and navigate to localhost:3000 and you should see NOTHING on your screen.
Go ahead and open your developer tools, navigate to your network tab and look for GetCustomerData request, and look inside you should see a response that contains all our customer data.
Using Chakra UI to see the data
Now Chakra UI is my choice of frameworks for React based frameworks, due to composition and if follows WAI-ARIA standards.
Installing ChakraUI
To install ChakraUI use the following:
npm install @chakra-ui/core @emotion/core @emotion/styled emotion-theming
Then inside your _app.js we are going to wrap it in a ThemeProvider and CSS Reset, this will cause it to reset default CSS styling, and allow us to use all the great features of ChakraUI. Your _app.js file by the end should look like this:
import { ThemeProvider, CSSReset } from "@chakra-ui/core";

function MyApp({ Component, pageProps }) {
  return (
    <ThemeProvider>
      <CSSReset />
      <Component {...pageProps} />
    </ThemeProvider>
  );
}

export default MyApp;
Then in our /pages/index.js file you will need to add some imports, these imports will include the add customer functionality so its going to seem like quite a lot!
import { useEffect, useState } from "react";
import {
  Heading,
  Flex,
  Stack,
  Box,
  Button,
  Input,
  FormControl,
  FormLabel,
  RadioGroup,
  Radio,
}from "@chakra-ui/core";

export default function Home() {
const [data, setData] = useState([]);

async function getCustomerData() {
      const res = await fetch("/api/customerData");
      const newData = await res.json();
      setData(newData);
    }

useEffect(() => {
getCustomerData();
  }, []);

  return (<div></div>);
}
...
Displaying the data to the user.
Now we have Chakra UI installed we can use this to display the customer data in the UI. To begin with lets create a Heading and sub heading, in ChakraUI we will us the Heading tag and tell it the heading size, so lets add a h1 and h2.
import { useEffect, useState } from "react";
import {
  Heading,
  Flex,
  Stack,
  Box,
  Button,
  Input,
  FormControl,
  FormLabel,
  RadioGroup,
  Radio,
} from "@chakra-ui/core";
export default function Home() {

  const [data, setData] = useState([]);

  async function getCustomerData() {
    const res = await fetch("/api/getCustomers");
    const newData = await res.json();
    setData(newData);
  }

  useEffect(() => {
    getCustomerData();
  }, [])

  return (
  <div>
      <Head>
        <title>Next.js, FaunaDB and Node.js</title>
      </Head>
      <Heading as="h1" my={2} textAlign="center">
        Next.js, FaunaDB and Node.js
      </Heading>
      <Heading as="h2" my={2} textAlign="center">
        Customer Data
      </Heading>
</div>
At this point if you look at your site, you should see a H1 and H2 at the top of the page, now we need to add some Flex. Under your Heading add <Flex mt={12} align="center" justify="center">
ChakraUI does not have a table component so we are going to create something that looks like a table. ChakraUI has a Stack component that does what it says, stacks elements on top of each other by default. So we can use that with a combination of their Heading to create table row headings which will be Name, Phone, Credit Card.
.....
 <div>
      <Head>
        <title>Next.js, FaunaDB and Node.js</title>
      </Head>
      <Heading as="h1" my={2} textAlign="center">
        Next.js, FaunaDB and Node.js
      </Heading>
      <Heading as="h2" my={2} textAlign="center">
        Customer Data
      </Heading>
      <Flex mt={12} align="center" justify="center">
      <Stack>
          <Heading mb={6} as="h4">
            Name:
          </Heading>
          <Heading mt={6} as="h4">
            Phone:
          </Heading>
          <Heading my={4} as="h4">
            Credit Card:
          </Heading>
        </Stack>
      </Flex>
</div>
Create our table row data component
Now we are going to create a new component to handle the data, we could just dump into our page but components are great! So lets create a folder in the root of our directory components/TableRow.js . This will take in some props and display our customer data to the user.
First we need to import some ChakraUI components, specifically Divider, Stack, Text, Box.
// components/TableRow.js

import { Divider, Stack, Text, Box } from "@chakra-ui/core";

export default function TableRow({}){
return(
<div>
</div>)
}
Now we need to put in our props, the props will be creditCard, firstName, lastName,telephone which will be passed from our data we request from FaunaDB.
import { Divider, Stack, Text, Box } from "@chakra-ui/core";

export default function TableRow({
  creditCard,
  firstName,
  lastName,
  telephone,
}) {
  return (
...
Now we have props to play with lets create our UI, now each one of the elements above is going to use the same structure. Each Text element will contain one of the props, and we will surround them with a Stack and a Box, then a divider to seperate them for example :
<Stack isInline>
        <Box>
          <Text fontsize="lg" my={4} mx={4}>
            {firstName} {lastName}
          </Text>
        </Box>
      </Stack>
     <Divider border="4px" />
So when we get finished we out CustomerData component it will look like the following:
import { Divider, Stack, Text, Box } from "@chakra-ui/core";

export default function CustomerData({
  creditCard,
  firstName,
  lastName,
  telephone,
}) {
  return (
    <Box>
      <Stack isInline>
        <Box>
          <Text fontsize="lg" my={4} mx={4}>
            {firstName} {lastName}
          </Text>
        </Box>
      </Stack>
      <Divider border="4px" />
      <Stack isInline>
        <Box>
          <Text fontsize="lg" my={4} mx={4}>
            {telephone}
          </Text>
        </Box>
      </Stack>
      <Divider border="4px" />
      <Stack isInline>
        <Box>
          <Text fontsize="lg" my={4} mx={4}>
            {creditCard}
          </Text>
        </Box>
      </Stack>
      <Divider border="4px" />
    </Box>
  );
}
Using our new component
So now we have created a component we can import this into our application and start using it to display our data. Head back to your index.js file and at the top import the component by using import CustomerData from "../components/CustomerData";
Then in between the Stack and Flex we created we are going to map over our data, and return it to the user.
// if data has a length
 {data.length > 0 ? (
// then we can map over the data.
          data.map((d) => (
//for each one lets return our customerData
            <CustomerData
              key={d.data.telephone}
              creditCard={d.data.creditCard.number}
              firstName={d.data.firstName}
              lastName={d.data.lastName}
              telephone={d.data.telephone}
            />
          ))
        ) : (
// if there is no data return the loading screen.
          <>
            <Text>Loading</Text>
          </>
        )}
Your index.js should look like this:
import { useEffect, useState } from "react";
import CustomerData from "../components/CustomerData";
import {
  Heading,
  Flex,
  Stack,
  Box,
  Button,
  Text,
  Input,
  FormControl,
  FormLabel,
  RadioGroup,
  Radio,
} from "@chakra-ui/core";
export default function Home() {

  const [data, setData] = useState([]);

  async function getData() {
    const res = await fetch("/api/getCustomers");
    const newData = await res.json();
    setData(newData);
  }

  useEffect(() => {
    getData();
  }, []);
  return (
    <Box>
      <Heading as="h1" my={2} textAlign="center">
        NextJS, FaunaDB and Servrless
      </Heading>
      <Heading as="h3" my={2} textAlign="center">
        Customer data
      </Heading>
      <Flex mt={12} align="center" justify="center">
        <Stack>
          <Heading mb={6} as="h4">
            Name:
          </Heading>
          <Heading mb={6} as="h4">
            Phone:
          </Heading>
          <Heading mb={6} as="h4">
            Credit Card:
          </Heading>
        </Stack>
        {data.length > 0 ? (
          data.map((d) => (
            <CustomerData
              key={d.data.telephone}
              creditCard={d.data.creditCard.number}
              firstName={d.data.firstName}
              lastName={d.data.lastName}
              telephone={d.data.telephone}
            />
          ))
        ) : (
          <>
            <Text>Loading</Text>
          </>
        )}
      </Flex>
  </Box>
) };
Now if we launch our code, you will see a table with our customer data!
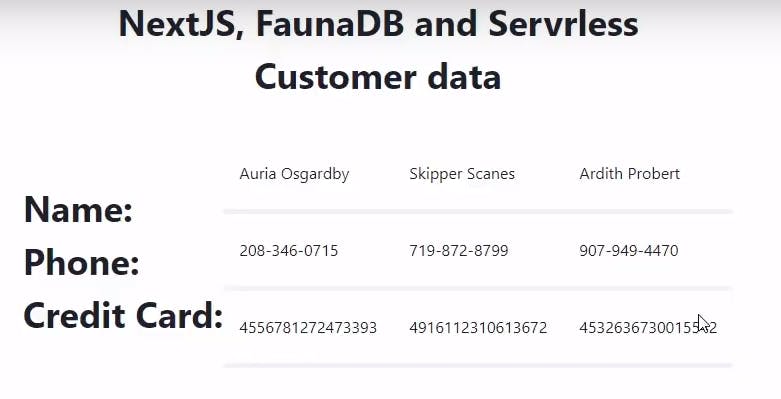
At this point you have successfully retrieve data from a database, and displayed it to your user. What happens if we want a new customer?
Adding a new customer
To add a new customer we are going to create another serverless function and a form for them to input their data.
Lets tackle the serverless function first and then add our form and data needed.
newCustomer Serverless function
The newCustomer serverless function is going to take in the body of the request, which will contain our form data. It will then update the collection with the data, and return a 200 for a successful add and a 500 for anything else.
Go ahead and create a new folder in your api directory called newCustomer and inside that folder create an index.js, below is the starter code that looks exactly the same as your previous one:
const faunadb = require("faunadb");

const secret = process.env.FAUNADB_SECRET_KEY;
const q = faunadb.query;
const client = new faunadb.Client({ secret });

module.exports = async (req, res) => {}
Now lets get to the new stuff, first we are going to take the req.body.data that will come from our front end and pass that down in a query.
const faunadb = require("faunadb");

const secret = process.env.FAUNADB_SECRET_KEY;
const q = faunadb.query;
const client = new faunadb.Client({ secret });

module.exports = async (req, res) => {
  const formData = req.body.data;

  try {
...
Then we start our query the same way const dbs = await client.query( and then we use the q.Create, which adds a new document and we specify our customer collection. When we add the code it will look like this:
const faunadb = require("faunadb");

const secret = process.env.FAUNADB_SECRET_KEY;
const q = faunadb.query;
const client = new faunadb.Client({ secret });

module.exports = async (req, res) => {
  const formData = req.body.data;

  try {
      const dbs = await client.query(
      q.Create(q.Collection("customers"), {
...
Now all we have to do is add our data, now if you look at your collection in the database it has the following fields:
- firstName
- secondName
- address object
- phone number
- credit card object.
So we can add all of those by using the data object, using the formData that we will come from the body as part of the request:
 data: {
          firstName: formData.firstName,
          lastName: formData.lastName,
          address: {
            street: formData.streetAddress,
            city: formData.city,
            state: formData.state,
            zipCode: formData.zipCode,
          },
          telephone: formData.phoneNumber,
          creditCard: {
            network: formData.cardType,
            number: formData.cardNumber,
          },
}
When we put this all together we get the following serverless function:
const faunadb = require("faunadb");

const secret = process.env.FAUNADB_SECRET_KEY;
const q = faunadb.query;
const client = new faunadb.Client({ secret });

module.exports = async (req, res) => {
  const formData = req.body.data;

  try {
    const dbs = await client.query(
      q.Create(q.Collection("customers"), {
        data: {
          firstName: formData.firstName,
          lastName: formData.lastName,
          address: {
            street: formData.streetAddress,
            city: formData.city,
            state: formData.state,
            zipCode: formData.zipCode,
          },
          telephone: formData.phoneNumber,
          creditCard: {
            network: formData.cardType,
            number: formData.cardNumber,
          },
        },
      })
    );
    res.status(200).json(dbs.data);
  } catch (e) {
    res.status(500).json({ error: e.message });
  }
};
Adding a customer in our index.js
With this new serverless function we can now update our database using a customer form. We are going to need a form, a way to handle changes and submission. Lets begin by building out our form, we are going to need a text field for every piece of our submission except our CardType we can make it a radio button.
Underneath the closing Flex tag add another Heading and then another Flex with align and justify center attached. Then create a form tag, so your code should now look like
import { useEffect, useState } from "react";
import CustomerData from "../components/CustomerData";
import {
  Heading,
  Flex,
  Stack,
  Box,
  Button,
  Text,
  Input,
  FormControl,
  FormLabel,
  RadioGroup,
  Radio,
} from "@chakra-ui/core";
export default function Home() {

  const [data, setData] = useState([]);

  async function getData() {
    const res = await fetch("/api/getCustomers");
    const newData = await res.json();
    setData(newData);
  }

  useEffect(() => {
    getData();
  }, []);
  return (
    <Box>
      <Heading as="h1" my={2} textAlign="center">
        NextJS, FaunaDB and Servrless
      </Heading>
      <Heading as="h3" my={2} textAlign="center">
        Customer data
      </Heading>
      <Flex mt={12} align="center" justify="center">
        <Stack>
          <Heading mb={6} as="h4">
            Name:
          </Heading>
          <Heading mb={6} as="h4">
            Phone:
          </Heading>
          <Heading mb={6} as="h4">
            Credit Card:
          </Heading>
        </Stack>
        {data.length > 0 ? (
          data.map((d) => (
            <CustomerData
              key={d.data.telephone}
              creditCard={d.data.creditCard.number}
              firstName={d.data.firstName}
              lastName={d.data.lastName}
              telephone={d.data.telephone}
            />
          ))
        ) : (
          <>
            <Text>Loading</Text>
          </>
        )}
      </Flex>
<Heading as="h4" mt={6} textAlign="center">
        Add a new customer
      </Heading>
      <Flex mt={12} align="center" justify="center">
        <form >
        </form>
    </Flex>
  </Box>
) };
We now need to add onSubmit={handleSubmit} and method="post" to the form, will will create the handleSubmit and onChange handling later. Each one of our inputs will be the following, a Form Label, and then an Input except the radio button.:
 <FormLabel htmlFor="firstName">First Name</FormLabel>
            <Input
              type="text"
              name="firstName"
              id="firstName"
              onChange={handleChange}
            />
Lets go ahead and add all of our inputs, for firstName, lastName, streetAddress, city, zip and state. Then we can create our radio buttons for Visa, Mastercard and American Express.
<FormControl>
            <FormLabel htmlFor="firstName">First Name</FormLabel>
            <Input
              type="text"
              name="firstName"
              id="firstName"
              onChange={handleChange}
            />
            <FormLabel htmlFor="lastName">Last Name</FormLabel>
            <Input
              type="text"
              name="lastName"
              id="lastName"
              onChange={handleChange}
            />
            <FormLabel htmlFor="streetAddress">Street Address</FormLabel>
            <Input
              type="text"
              name="streetAddress"
              id="streetAddress"
              onChange={handleChange}
            />
            <Stack isInline mt={2}>
              <FormLabel htmlFor="city">City</FormLabel>
              <Input
                type="text"
                name="city"
                id="city"
                onChange={handleChange}
              />
              <FormLabel htmlFor="zipcode">zipcode</FormLabel>
              <Input
                type="text"
                name="zipcode"
                id="zipcode"
                onChange={handleChange}
              />
              <FormLabel htmlFor="state">State</FormLabel>
              <Input
                type="text"
                name="state"
                id="state"
                onChange={handleChange}
              />
            </Stack>
            <FormLabel htmlFor="phoneNumber">Phone Number</FormLabel>
            <Input
              type="text"
              name="phoneNumber"
              id="phoneNumber"
              onChange={handleChange}
            />
`
ChakraUI has a Radio Group that will line up and keep your radio buttons together, so we can use that alongside our radio buttons to create a single select option.
<RadioGroup name="cardType" my={4} spacing={8} isInline>
              <Radio
                onChange={handleChange}
                name="Visa"
                value="Visa"
                label="Visa"
              >
                Visa
              </Radio>
              <Radio
                onChange={handleChange}
                name="Mastercard"
                value="Mastercard"
                label="Mastercard"
              >
                Mastercard
              </Radio>
              <Radio
                onChange={handleChange}
                name="Amex"
                value="Amex"
                label="Amex"
              >
                American Express
              </Radio>
            </RadioGroup>
You can this to your form, after your address, it will only allow a single selection and will be align horiziontally.
Finally we need the cardNumber and a button to submit this so lets add those:
<Input
              type="number"
              name="cardNumber"
              id="cardNumber"
              onChange={handleChange}
            />
            <Button
              type="submit"
              my={8}
              ml="20%"
              width="50%"
              size="md"
              border="2px"
              borderColor="green.500"
            >
              Add Customer
            </Button>
The full form should now look like this
 <form onSubmit={handleSubmit} method="post">
          <FormControl>
            <FormLabel htmlFor="firstName">First Name</FormLabel>
            <Input
              type="text"
              name="firstName"
              id="firstName"
              onChange={handleChange}
            />
            <FormLabel htmlFor="lastName">Last Name</FormLabel>
            <Input
              type="text"
              name="lastName"
              id="lastName"
              onChange={handleChange}
            />
            <FormLabel htmlFor="streetAddress">Street Address</FormLabel>
            <Input
              type="text"
              name="streetAddress"
              id="streetAddress"
              onChange={handleChange}
            />
            <Stack isInline mt={2}>
              <FormLabel htmlFor="city">City</FormLabel>
              <Input
                type="text"
                name="city"
                id="city"
                onChange={handleChange}
              />
              <FormLabel htmlFor="zipcode">zipcode</FormLabel>
              <Input
                type="text"
                name="zipcode"
                id="zipcode"
                onChange={handleChange}
              />
              <FormLabel htmlFor="state">State</FormLabel>
              <Input
                type="text"
                name="state"
                id="state"
                onChange={handleChange}
              />
            </Stack>
            <FormLabel htmlFor="phoneNumber">Phone Number</FormLabel>
            <Input
              type="text"
              name="phoneNumber"
              id="phoneNumber"
              onChange={handleChange}
            />
            <RadioGroup name="cardType" my={4} spacing={8} isInline>
              <Radio
                onChange={handleChange}
                name="Visa"
                value="Visa"
                label="Visa"
              >
                Visa
              </Radio>
              <Radio
                onChange={handleChange}
                name="Mastercard"
                value="Mastercard"
                label="Mastercard"
              >
                Mastercard
              </Radio>
              <Radio
                onChange={handleChange}
                name="Amex"
                value="Amex"
                label="Amex"
              >
                American Express
              </Radio>
            </RadioGroup>
            <FormLabel htmlFor="cardNumber">Card Number</FormLabel>
            <Input
              type="number"
              name="cardNumber"
              id="cardNumber"
              onChange={handleChange}
            />
            <Button
              type="submit"
              my={8}
              ml="20%"
              width="50%"
              size="md"
              border="2px"
              borderColor="green.500"
            >
              Add Customer
            </Button>
          </FormControl>
        </form>
adding state, Initial form data.
Our form is complete but we need some state to handle the input and also some initial data. At the top of your Home function lets add a const called initialFormData that is an Object.freeze that will handle all of our form elements.
const initialFormData = Object.freeze({
    firstName: "",
    lastName: "",
    streetAddress: "",
    city: "",
    state: "",
    zipCode: "",
    phoneNumber: "",
    cardType: "",
    cardNumber: null,
  });
The Object.freeze stops us from adding additional field properties which is great for our form as we don't want to accidentally add something our database does not currently have.
Then lets add another state for our formData, const [formData, updateFormData] = useState({}); this will be updated through our onChange and onSubmit.
Creating our handleChange
The handleChange that we attached to our forms will update our object values based upon the name. This will just update the single field leaving the others alone:
 const handleChange = (e) => {
    updateFormData({
      ...formData,
      [e.target.name]: e.target.value,
    });
  };
This handleChange takes in what has changed, looks for the targetName in our FormData and updates it to the value we pass. Add this after your useEffect.
Creating our onSubmit
Our onSubmit will take the formData and submit it our API, but first lets create a method that calls our API. When using fetch with POST we need our request options, and I personally like to keep them as separate variable, we are going to need the method, header for content type and finally the formData stringified nicely for our API.
 const requestOptions = {
    method: "POST",
    headers: { "Content-Type": "application/json" },
    body: JSON.stringify({ data: formData }),
  };
Now we've added a requestOptions variable, we can create a addCustomer function that makes the API call, and if it is successful we will make a call to our getData() so we can refresh our table at the top.
async function addCustomer() {
    await fetch("api/newCustomer", requestOptions)
      .then(() => getData())
      .catch((e) => console.log(e));
  }
Our Form is complete your full index.js should look like below:
import { useEffect, useState } from "react";
import CustomerData from "../components/CustomerData";
import {
  Heading,
  Flex,
  Stack,
  Box,
  Button,
  Text,
  Input,
  FormControl,
  FormLabel,
  RadioGroup,
  Radio,
} from "@chakra-ui/core";
export default function Home() {
  const initialFormData = Object.freeze({
    firstName: "",
    lastName: "",
    streetAddress: "",
    city: "",
    state: "",
    zipCode: "",
    phoneNumber: "",
    cardType: "",
    cardNumber: null,
  });

  const [data, setData] = useState([]);
  const [formData, updateFormData] = useState({});
  const requestOptions = {
    method: "POST",
    headers: { "Content-Type": "application/json" },
    body: JSON.stringify({ data: formData }),
  };
  async function getData() {
    const res = await fetch("/api/getCustomers");
    const newData = await res.json();
    setData(newData);
  }
  async function addCustomer() {
    await fetch("api/newCustomer", requestOptions)
      .then(() => getData())
      .catch((e) => console.log(e));
  }
  useEffect(() => {
    getData();
  }, []);

  const handleChange = (e) => {
    updateFormData({
      ...formData,
      [e.target.name]: e.target.value,
    });
  };

  const handleSubmit = (e) => {
    e.preventDefault();
    addCustomer();
  };
  return (
    <Box>
      <Heading as="h1" my={2} textAlign="center">
        NextJS, FaunaDB and Servrless
      </Heading>
      <Heading as="h3" my={2} textAlign="center">
        Customer data
      </Heading>
      <Flex mt={12} align="center" justify="center">
        <Stack>
          <Heading mb={6} as="h4">
            Name:
          </Heading>
          <Heading mb={6} as="h4">
            Phone:
          </Heading>
          <Heading mb={6} as="h4">
            Credit Card:
          </Heading>
        </Stack>
        {data.length > 0 ? (
          data.map((d) => (
            <CustomerData
              key={d.data.telephone}
              creditCard={d.data.creditCard.number}
              firstName={d.data.firstName}
              lastName={d.data.lastName}
              telephone={d.data.telephone}
            />
          ))
        ) : (
          <>
            <Text>Loading</Text>
          </>
        )}
      </Flex>
      <Heading as="h4" mt={6} textAlign="center">
        Add a new customer
      </Heading>
      <Flex mt={12} align="center" justify="center">
        <form onSubmit={handleSubmit} method="post">
          <FormControl>
            <FormLabel htmlFor="firstName">First Name</FormLabel>
            <Input
              type="text"
              name="firstName"
              id="firstName"
              onChange={handleChange}
            />
            <FormLabel htmlFor="lastName">Last Name</FormLabel>
            <Input
              type="text"
              name="lastName"
              id="lastName"
              onChange={handleChange}
            />
            <FormLabel htmlFor="streetAddress">Street Address</FormLabel>
            <Input
              type="text"
              name="streetAddress"
              id="streetAddress"
              onChange={handleChange}
            />
            <Stack isInline mt={2}>
              <FormLabel htmlFor="city">City</FormLabel>
              <Input
                type="text"
                name="city"
                id="city"
                onChange={handleChange}
              />
              <FormLabel htmlFor="zipcode">zipcode</FormLabel>
              <Input
                type="text"
                name="zipcode"
                id="zipcode"
                onChange={handleChange}
              />
              <FormLabel htmlFor="state">State</FormLabel>
              <Input
                type="text"
                name="state"
                id="state"
                onChange={handleChange}
              />
            </Stack>
            <FormLabel htmlFor="phoneNumber">Phone Number</FormLabel>
            <Input
              type="text"
              name="phoneNumber"
              id="phoneNumber"
              onChange={handleChange}
            />
            <RadioGroup name="cardType" my={4} spacing={8} isInline>
              <Radio
                onChange={handleChange}
                name="Visa"
                value="Visa"
                label="Visa"
              >
                Visa
              </Radio>
              <Radio
                onChange={handleChange}
                name="Mastercard"
                value="Mastercard"
                label="Mastercard"
              >
                Mastercard
              </Radio>
              <Radio
                onChange={handleChange}
                name="Amex"
                value="Amex"
                label="Amex"
              >
                American Express
              </Radio>
            </RadioGroup>
            <FormLabel htmlFor="cardNumber">Card Number</FormLabel>
            <Input
              type="number"
              name="cardNumber"
              id="cardNumber"
              onChange={handleChange}
            />
            <Button
              type="submit"
              my={8}
              ml="20%"
              width="50%"
              size="md"
              border="2px"
              borderColor="green.500"
            >
              Add Customer
            </Button>
          </FormControl>
        </form>
      </Flex>
    </Box>
  );
}
Go ahead and test this, you should successfully create a new customer and your "table" at the top should refresh with the new data!
That is the end of the crash course! If you did enoy it make sure to leave a comment, tell a friend!